Tune Up Time: Mid-Century Modern Living room Renovation

So I have a problem; I like going on real estate websites and looking at fixer uppers, and then thinking what would I do if this was my place. That’s how I found this 1970s condo living room. This space has a lot to love, but it also needs some work mostly due to the space just being dated and lacking defining features.

There are two big features of this space that I love. I love the huge window, which brings in so much natural light. This windows helps make the space brighter and more welcoming. The second feature I love is the fairly open floor plan which allows for a nice flow in an out of the living room. Together these two features are good bones to build off to create a unified space.

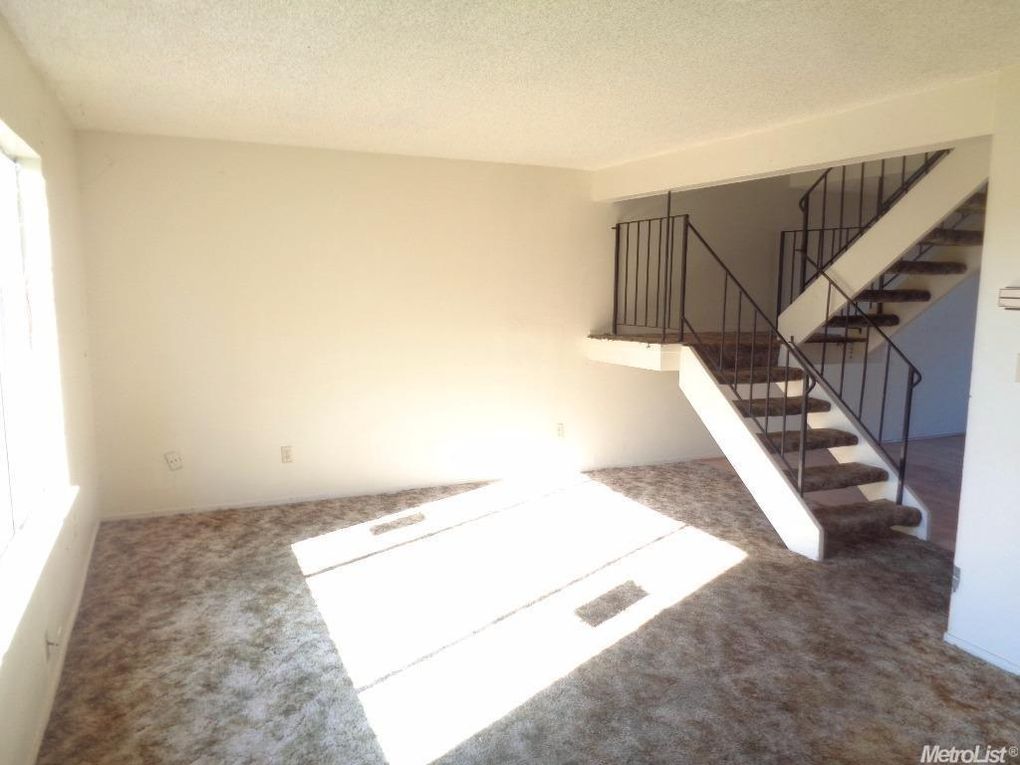
Since this is a condo I am making a big assumption that the space is owned. So change the floor (which you most likely won’t be able to do if you rent) to some kind of hardwood, laminate, or wood-look vinyl in a grey, which should be continued through the entire first floor. The brown carpet is dated and it is reflecting an off white light onto the otherwise white walls. The floor also changes midway through the stairwell which divides the space up oddly and makes the floor seem out of level. By changing out the floor the space will feel more unified and larger.

The next element this room needs is a low visual impact partition wall to take attention away from the stairs. In some spaces, this division can be achieved with the stair railing, but in this space the railing doesn’t do enough and feels odd. This division, however, can be achieved by taking inexpensive furring strips, painting them black, and attaching it to the soffit at the top and to another furring strip on the floor to keep them up straight. Then take a 1”x12” that is painted white and attach it to the furring strips so it looks like the landing is extended to the end of the room divider. This partition will give some division between the room and the stairs but it won’t prevent the light from entering the stairs which will preserve the open feel of the space.

The popcorn ceiling is also ugly and needs to be changed. Again, if the space is owned, have the ceiling scraped off and replaced by a professional. It is worth the cost since it probably contains asbestos, but if the space is a rental just be careful not create a large amount of dust and wear a mask. Take more of the black furring strips and have them go across the entire ceiling to seem like they are beams which will dress up the ceiling and give us a place to hide cords for the lights later on.

Since we are taking away the two biggest acoustic elements of the space, we need to add some new ones in. While fabric furniture will provide a large amount of sound deadening, a large floor rug and curtains will provide even more. A circular floor rug will help define the space create defined traffic flow. Flat curtain panels hung from a track system will also cut down on echo as long as the track is attached to the ceiling. A curtain track system will also look cleaner and more modern since the curtains are flat panels instead of bunching up when pushed to the sides.

The next piece is the creation of a conversation pit in the living room. In the center of the room would be the perfect place for a circular coffee table which would preserve the open feel and allow people to move around easily. In the back corner by the partition would be the perfect place for a tuxedo couch like the IKEA Norsborg Sofa, just be sure to change out the legs to something more modern and less stubby. In the front corner by the window would be the perfect place to put a media center and TV that is understated and out of the way but still usable. Finally, on the other side of the pit would be the perfect place for two wingback chairs like the Strandmon from IKEA. Just make sure the furniture isn’t all the same color or else it will look too much like a set which is boring.

On the back wall, would be the perfect place for a gallery wall. This area needs something that will fill the space nicely but won’t be overly heavy since the room is so open. This rules out any kind of shelving or built-ins, since those would be too visually heavy. A gallery wall is a nice place to display things that are important to you, without being too in your face. There is no right or wrong way to create a gallery wall, and they can be as simple or complex as you want. This wall will be a feature and it will finish up the room.

Finally, lighting will put the finishing touches on the room. IKEA has amazing plug in spot lights, which would be perfect to use on the gallery wall. They can be screwed into the ceiling to wash the gallery wall with light and then the cords are run along faux beams and the partition wall to a receiver for a wireless switch and they will look like they are permanent lights, but they won’t be. Then on the partition next to the couch would be the perfect place for clamp on light. This light will provide task lighting when on the couch. Finally, in between the two wingback chairs, would be the perfect place for a streamlined cigar shaped floor lamp which will provide task lighting at the chairs without being too intrusive. The lighting is the final touch for bringing together the room.

Together these details come together and create a cohesive mid century modern look for the space which uses the light and the openness of the space to its advantage, instead of fighting it. By making these few changes the space is now more cosy and functional; exactly how a living room should be.

Tune Up Time: Bathroom Redo

The old adage goes, there are two rooms that sell houses, and those are bathrooms and kitchens. While these two rooms may sell houses, I am of the mindset that these rooms should always look nice and they should fit into your life. For this week’s Tune Up Time, I will be giving this utilitarian rental bathroom a makeover that will greatly increase the look and the functionality on a budget.

In this bathroom, there are two things that I would not touch for this renovation: the first is the cabinets, they’re a nice dark wood shaker style, which contrasts the lighter elements in the space well, and the second is the brushed nickel/chrome fixture which are timeless and versatile so they will work with almost any style. Both of these two elements are fairly simple as well which helps them fit into almost any style. For this renovation, keep these fixtures and save the budget for other parts of the new design.

The first change for the space needs to be dressing up the window corner. The mgniblinds that were used are ugly and look like they were taken out of a 1980s office. And while they need to go back to that office, they can be difficult to take down and put back up when you move out. Instead we are going to focus on hiding them. A cornice will look nice, and if it is added from ceiling level to just below the top of the window it will conceal the ugly mechanicals for the mini blinds. Then hang long curtain panels inside the cornice that reach the floor which will hide the edges of the mini blinds and the additional hardware like the cord the turning rod. Just remember we are only trying to hide the edges of the window, because we are technically treating the wall not the window.

The shower could use some dressing up as well. The original curtain rod is a nice place to hang an inexpensive clear liner so the water doesn’t splash everywhere, but it isn’t very high up, which will make the ceiling seem oddly low. To fix this problem, add a curved shower rod that is high up and further out, just outside the shower surround. The curtain used here doesn’t have to be a shower curtain then since it won’t be getting wet, however, the curtain should be similar to the one used on the window since the two are in the same room.

The next change for this bathroom is all the white grab bars and toilet roll holder need to be replaced with chrome, brushed nickel, or stainless steel ones. All three of these metals look similar enough that you can get by with combining them and they don’t look out of place. This way the bars will match the plumbing fixtures, the cabinet hardware, and the light fixture. The white bars look cheaper than the metal ones even though they cost more, especially on the gross beige off white wall that should be repainted high contrast white. By replacing these bars, you will then unify the space because all your fixtures will match.

The next glaring issue with this bathroom is the weird medicine that is divided into thirds. I never seen a medicine cabinet divided up like this outside of this building, especially coupled with high storage cabinets right next to the sink, so it just needs to be replaced. Medicine cabinets are easy to take down and put back up when you move out with a simple drill-driver. In its place, a mirror that is framed to match the cabinets instead of getting something with an equally weird white border will help unify the space as well. That way you can actually use the mirror without large black lines dividing your face into thirds like some kind of geometry problem.

Next, cover the vanity top with marble contact paper. While this project is not expensive at all, it is involved, but it will dress up the room and make it worth it. The white fiberglass top is ugly and will be a pain to keep clean unless you religiously bleach it. Marble is timeless, and will keep the light look that the top currently has, which I do like since it contrasts the cabinets in a good way.

Then, in the odd gap between the vanity and the window, place a small end table which would be a good place to add a plant. The plant will add an organic spa like element to the space, and a real plant will help clean out the air which is always nice. Just make sure to leave enough space in the corner for curtain panels to gather.

Above the toilet is an oddly large empty wall. This space would be perfect for either high above the toilet overflow storage or it would be a nice place for a large mirror that would also be framed to match the cabinets. If you go with the storage idea, either use shallow off the shelf cabinets that match the vanity or DIY a shallow open shelving unit that is stained to match the wood of the cabinets. Either way use French Cleats to hang the storage since they can be hidden easily and are remarkably strong. Either solution will fill the space in nicely and create a welcoming feel for the space.

Finally, the grouted vinyl tile isn’t a great look especially in the fake red stone finish, so a nicer rug would be perfect in the space. For a completely unique look, an outdoor rug would be perfect, since there aren’t as many designs for bathmats as there are outdoor rugs. Outdoor rugs are also designed to get wet and dry quickly, so they are prefect for use in a bathroom. The rug is the final touch that will bring the room together and unify the space.

With simple touches, the space went from looking like a hodgepodge of random utilitarian off the shelf elements in a typical rental, to a personal bathroom that would be pleasant to use on a daily basis.

Tune Up Time: Kitchen/Dining Makeover

The kitchen in most homes is the most important room. Not only does the room have to be functional, but it also needs to look good. While this typical rental kitchen has some elements I do like, for example the dark wood cabinets, there are several elements that I do not like that need to be either dressed up or changed.


Most rentals do not have nice wooden cabinets, this rental however has fairly nice looking dark wood cabinets that should stay. Wood cabinets don’t work in all spaces, but in this space add a much needed organic element, especially when contrasted with the brushed nickel hardware. They are also a simple enough shaker style that they can go with most styles which makes them versatile in their current form. My verdict is to leave them alone.

The first change this spaces needs is a fresh coat of paint that is not institutional off white. These walls are a beige-y warm off white. A neutral high contrast white will look much better for the space by not only brightening it up, but the paint color will also provide a better contrast with the cabinets. In the actual kitchen part, a semi-gloss paint will also hide the recessed lights in the ceiling and switch plates better while providing an easier to clean finish. In the rest of the room (and apartment) either a satin or eggshell finish would be better since they will brighten the space but not overpower; as well, glossy paints are only necessary in areas where durability and the ability to regularly clean are desired, otherwise a less expensive satin or eggshell is fine.


A pro tip for good design, is to paint the switch plates and registers when a room is painted. In the first picture every outlet, light switch, and heating register is clearly visible, even in the background of the image. This effect is not desired. While these objects are required to have a functioning house, by painting over they will blend into the wall and become unnoticeable unless the viewer is up close. It is worth it in a rental to just spend the money to replace the switch plates when you move out if simply painting over them white doesn’t return them to a desired color (and usually painting them white will suffice). This tip is the difference between good design and great design.


The next part of the room that stands out is the institutional metal double doors and electrical panel. Behind the double doors is the washer and dryer so they can’t just be covered with shelves or artwork that isn’t easy to move; instead, hang either a large tapestry or several curtain panels to cover the ugly elements and act as a feature wall. By using something that can easily be moved out of the way the washer and dryer can still be used on a regular basis and the electrical panel is easily accessible in the event that a breaker is tripped, but you won’t have to look at any of the design faux pas. IKEA has relatively inexpensive options for wire or track options for hanging the panels or tapestry. Conversely, you could also DIY a wire using off the shelf parts from a home center if you desire full control over the solution.


In front of the long half wall, a sofa table or some other type of long thin tall table would work well in the space and not overpower the room. Something like a Parsons Table or a table with hairpin or taper legs will add visual interest to the space. Then on top of the table, style with circular elements like using pillar candles on a circular serving platter or plate and using a circular bowl as a drop zone to counteract all the harsh angles of the half wall. Then add a plant to the table in a circular pot to not only add an organic feel to the space (which will help the place feel homier and less institutional), but also add another circular element. Just remember to style it in threes or a similar magic “design number.”


On the large swath of wall next to the opening would be a great place to hang a mirror. The mirror should be large and extend almost all the way from the top of the table to the ceiling. This mirror will do two things then: first it will make the space feel bigger by not only reflecting part of the room and light, but it will also draw the eye up by extending so far up on the wall; secondly the mirror will minimize the visual impact of the soffit by drawing the eye toward a different element of the design, i.e. the mirror.


Above the table, would be a good place to hang a plug in pendent light which would add nice general lighting to the space and help further define the area around the table. The addition of this light will also get us to the magic design number of three which is a good balance for design work. To increase the design level further, hide the cord for the light behind mirror and table and use a wireless switch like Phillips Hue or Lutron Caséta to turn the light on an off. This design choice will make the pendent seem like it is permanently installed without requiring an electrician to be called.


While on the topic of lighting, the institutional fluorescent light fixture in the kitchen needs to have a diffuser either built or bought to cover it. It looks like it belongs in a utilitarian office, and will stand out in a bad way no matter how well the rest of the space is designed.


In front of the short half wall would be a good place to add a small kitchen cart which could act as storage for dining essentials or as a bar. This element will help define the small transitional area as a dining room and better utilize the space. It will also create functional decor, which is taking something that is used or consumed and treating it like a decoration. Place the alcohol on a circular mirrored serving platter to further counteract the harsh angles of the half wall, or use a circular cart, but those can be expensive and hard to find. On the lower shelf of the cart, would be a good place to house overflow storage in decorative storage boxes to further counteract the harsh angles.

To completely define the space as a dining area, a large rectangular rug that will completely cover the odd transition between ugly office carpet and ugly vinyl tile would be necessary to fully define the space and remove the odd breakup of the room. Then on top of that rug, place a circular rug in something like grey or jute to define the area where the table will go and create open defined traffic flow patterns for the space. These rugs fully defines the area as a dining room.


On top of the circular rug, should then be a circular table. A table with a design language similar to the Saarinen Table would be perfect space the space, especially if it is accompanied with similar chairs in either colored or clear acrylic. While Knoll (the company that makes the real Saarinen) charges thousands of dollars for even a smaller version of the table, IKEA sells a 41” table that looks almost the same for under $200. If you want the marble top that some versions of the Saarinen Table have, a roll of marble contact paper can achieve the desired look on a budget and no one will be the wiser, well unless they have to move it.


Finally above the table would be a perfect place to use one of the recessed light to pendent kits to provide better dining task lighting. While this is not pictured, it will put the final touch on the space and make the dining room brighter and create a better dining experience, especially if the fixture is paired with something like Phillips Hue or Lutron Caséta which allows an infinite number of options for controlling the lights to create the perfect ambiance.


This space is now more cohesive and better designed than when I started with it, and some of the more questionable elements have been either changed or hidden which increases the design level of the space dramatically. At the end of the day, the space is homier and more comfortable to spend time in.